
Building: location, images, files and the mood card
Module 2: The first version · Reading time: 11 minutes
Learning objective: After this lesson you can have a first version built: attach files, choose the location and the type of images, follow the build, and then use the mood card, the tour and the builder screen to assess your first version.
Key concepts: attachment, location, Free website, package, type of images, build time, mood card, style, palette, Email from your contact form, tour, rail, preview, memory
Attaching files
Before you click Create website, you can attach files with Add file, or by dragging them onto the start card. Useful examples are a leaflet, a price list, your old texts, your logo and photos of your business.
The limits:
- at most 6 files, each at most 8 MB;
- documents: PDF, Word (.docx), text and csv;
- photos: JPG, PNG and WebP.
What happens to them? From documents, the builder reads the text and uses it as a source, just like your description. Photos become your site's own media; the builder saves them again, which removes metadata such as location data. Schildersbedrijf Example attaches its price list as a PDF and four photos of finished work.
An attachment does not replace a good description. Put the essentials (name, main action, contact details) in the description itself, and details such as a long price list in the file.
Choosing the location and type of images
After Create website, the window Where should your website go? opens. At the top it says: "You can always move to a package or your own domain later."
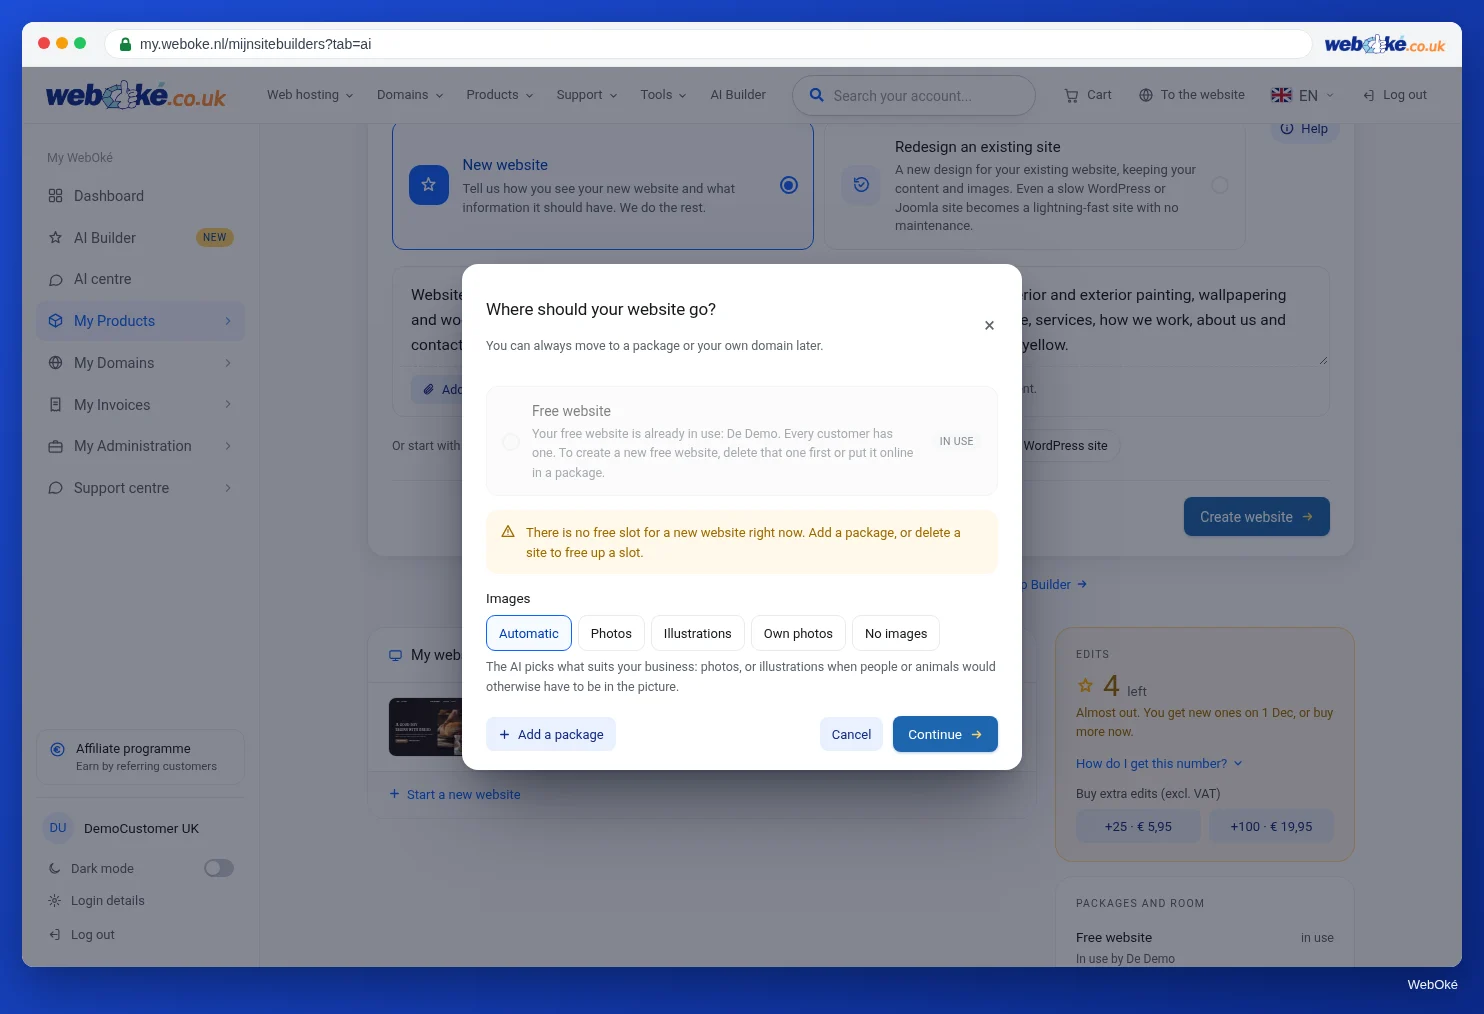
The location. You choose:
- Free website: on our address (name.weboke.site), free and permanently online. If your free spot is already taken, you can see which site is using it.
- An AI Builder package, with its domain. A green label shows whether there is room.
If you choose a package, you also get the Email from your contact form card after the build (see below). If you have no free spot, you can Add a package here.
Images. Below that, you choose what kind of images the AI makes for your site:
| Choice | What happens |
|---|---|
| Automatic | The AI chooses what suits your business: photos, or illustrations if people or animals would otherwise need to be shown |
| Photos | Photorealistic atmosphere images |
| Illustrations | Soft, playful illustrations that match the style of your site |
| Own photos | The AI leaves the image spots empty; you add your own photos |
| No images | Text only, without image spots |
Which should you choose? If you have good photos of your own work, choose Own photos: then your site won't show atmosphere images that look like your work but aren't. If you first want to get an idea of the site, Automatic is fine; you replace the images later. Your choice applies to new images and you can change it later under Brand style > Images. You replace existing images via the chat or by clicking on a photo.
An AI image is an atmosphere image, not a photo of your work. Don't present it as a project you actually did. More on this in lesson 2.4 and lesson 3.3.
Click Continue to build.
The build
The build usually takes two to four minutes. In the chat you see the steps go by: Reading your description, Writing pages and texts, Making photos and Assembling the site. You can leave the window open; if you reload the page, the builder picks up the progress again.
What it costs: your very first build is free. Every following complete build costs 5 edits. You can run at most 2 instructions at the same time.
If the build fails, you pay nothing. Just try again, perhaps with a shorter description.
After the build: the mood card
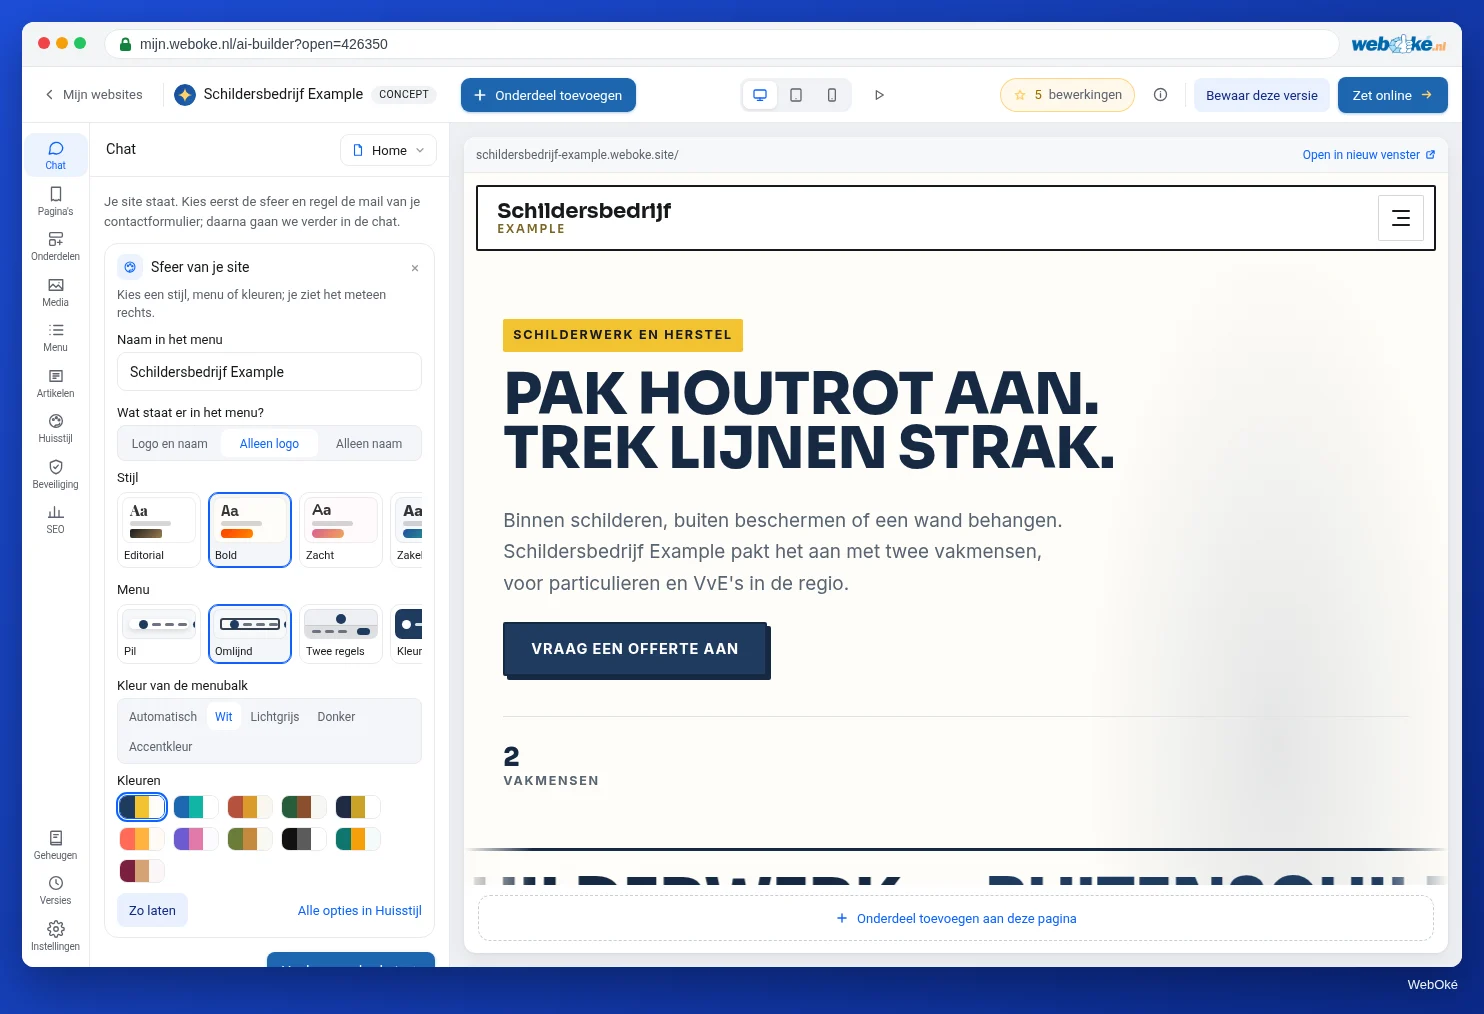
Once the first version is ready, your site appears on the right, and at the top left of the chat you see: "Your site is ready. First choose the mood and set up the mail from your contact form; then we'll continue in the chat."
The mood card (Mood of your site) lets you try a different direction with one click. You see the result straight away on the right:
- Name in the menu and, if you have a logo, what appears in the menu (logo, name or both). If you don't have a logo, you can Create a logo here;
- Style: the look of the whole site;
- Menu: the design of the menu bar;
- Colour of the menu bar: Automatic, White, Light grey, Dark or Accent colour;
- Colours: fixed palettes, with your own colours first if they differ.
Happy with it? Click Save. Want to go back? Click Back. Want to leave everything as it is? Choose Keep as is. All options in Brand style takes you to the full panel. Choosing on the mood card costs nothing.
If you chose a package, the Email from your contact form card appears below it. There you choose in one go where messages from your form arrive and which address on your domain sends them. We cover this in lesson 5.3; for now you can also choose Later. On the free site the form sends nothing, so this card doesn't appear there.
Continue to the chat closes the onboarding. The chat then shows a welcome message.
The tour and the builder screen
With your first site, a tour of the builder starts. It points out the most important places: the preview on the right, the chat text box, Pick a section, the rail with the panels, Brand style, SEO, Settings, Pages, Articles, Versions, the buttons for phone and tablet, the pill with your edits and Go live. You can skip it and run it again later via the i icon in the top bar (Help).
What's missing? That's for you to find out
Important to know: after the build you get no list of what the AI filled in itself or missed. The builder does tell you at these moments:
- Before the build, if your description is very short, it asks the follow-up question (lesson 2.1).
- If your site promises quick help but has no phone number, a bar appears above the preview where you can enter your number. With Put it on the site, the buttons become call buttons.
- The Memory panel (at the bottom of the rail) shows what the AI knows about your business, by topic. Under To do you find what you still need to supply or what still needs to happen, if the AI wrote it down. If a line is wrong, edit it; that costs nothing.
- When you go live, the builder stops you if your site still contains fixed sample text or a placeholder such as "[fill in]", and tells you what else it noticed during its check (lesson 2.4).
Made-up prices, opening hours or a made-up name look just like real content in the preview. That's why you always check your first version yourself, page by page. That's lesson 2.4.
Summary
- Attach at most 6 files of 8 MB: PDF, Word, text, csv and photos (JPG, PNG, WebP).
- In Where should your website go? you choose the free website or a package, and the type of images: Automatic, Photos, Illustrations, Own photos or No images.
- The build usually takes two to four minutes; the very first is free, every following complete build costs 5.
- After the build, you choose style, menu and colours for free on the mood card; with a package you also set up the mail from your form.
- You don't get a list of what the AI filled in: look in Memory under To do and check the site yourself.
Quiz
Exercise
Exercise D2.2: Having your first version built. Build your own site with the description from exercise D2.1.
Checklist:
- [ ] description pasted into Describe your website;
- [ ] files attached (or deliberately not);
- [ ] location chosen in Where should your website go?;
- [ ] type of images chosen;
- [ ] build followed until the site appeared on the right;
- [ ] mood card viewed and a style, menu and colours chosen, or Keep as is;
- [ ] tour followed or started later via Help;
- [ ] Memory panel opened and read.
Questions:
- Which location and which type of images did you choose, and why?
- What did you change on the mood card?
- What was in the memory that was wrong or missing?
After "done" you see a sample answer: free website for practice, Own photos because there are four photos of finished work; on the mood card a calmer style and the menu with a dark bar were chosen; the memory listed the service area as 20 km instead of 25 km, and that line was corrected.
Exercise D2.2: Having your first version built
You do this exercise yourself; no one checks it. Tick off what you've done and mark the exercise as done.
Free website to practise with, Own photos because there are four photos of finished work; on the mood board a calmer style and the menu with a dark bar chosen; the memory listed the service area as 20 km instead of 25 km, that line has been corrected.
Your ticks and notes only stay in this browser; we don't send them anywhere. If you're signed in, we only save in My courses that you've done the exercise.