
Module 6 · 6.2
English
Connecting Google Search Console
Module 6: Getting found · Reading time: 9 minutes
Learning objective: After this lesson you can add your AI Builder site to Google Search Console, confirm ownership with the HTML tag via the builder or with a DNS record, submit your sitemap and do the same in Bing Webmaster Tools.
Key concepts: Google Search Console, property, URL prefix, domain property, confirming ownership, HTML tag, google-site-verification, TXT record, submitting a sitemap, Bing Webmaster Tools, IndexNow
What Search Console gives you
Google Search Console is a free Google service for site owners. It shows you which searches your site appears for, how often people click, which pages are in Google and which are not, and why not. Google also reports problems there, such as pages that cannot be reached.
You don't need Search Console to be found. Google finds your site without it; the builder says so itself: "Not needed to be found." But without Search Console you are flying blind: you don't know whether Google already knows your new pages or which words people use to find you.
Search Console only works for a site on your own domain. The free WebOké address has a noindex (lesson 6.1): Google deliberately leaves those pages out, so there is nothing to measure.
First, prove the site is yours
Before Google shows you the data, you have to prove you are the owner. To do that, you add a property in Search Console. There are two kinds:
- Domain: the whole domain name, so
example.com,www.example.com, http and https and all subdomains together. You can only confirm it with a DNS record. - URL prefix: exactly one address, such as
https://example.com/. You can confirm it in several ways, including with an HTML tag on your homepage.
Both work. The HTML tag is the easiest for most people, because you paste it into the builder. The DNS record covers more and keeps working, whatever happens to your site.
Route 1: the HTML tag via the builder
- Go to Search Console, choose Add property and then URL prefix. Enter the address your site actually runs on. The builder uses the address without www, so usually
https://example.com/(lesson 5.2). - Under the verification methods, choose HTML tag. Google shows a line starting with
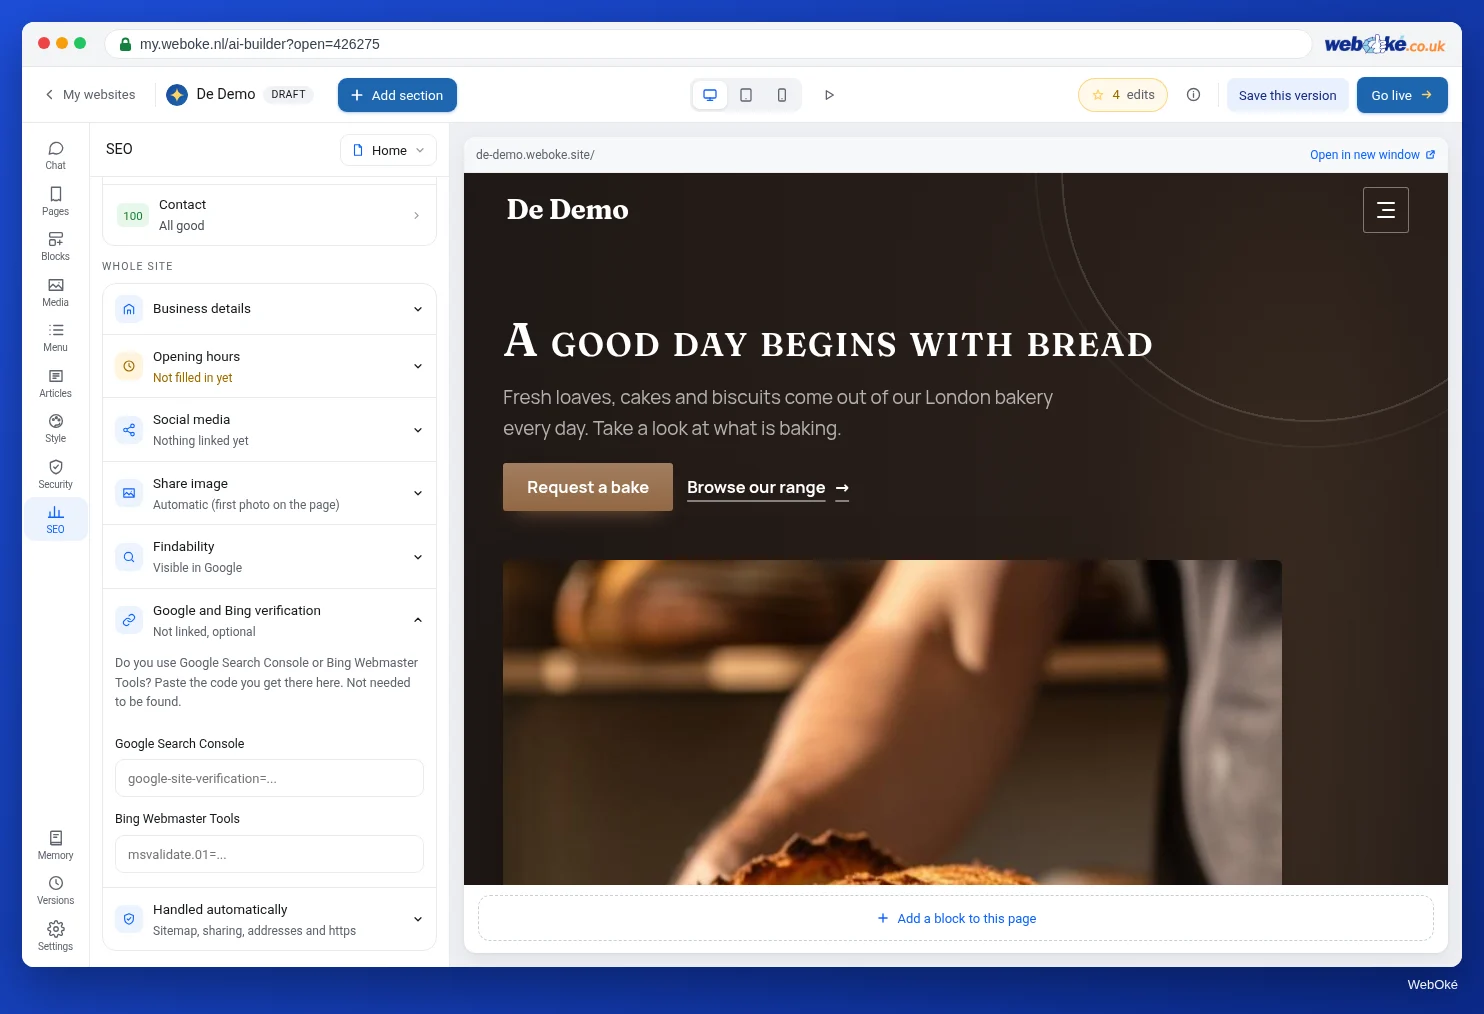
<meta name="google-site-verification" content=".... Copy it. - In the builder, open SEO, tab Whole site, and expand Google and Bing verification. It says: "Do you use Google Search Console or Bing Webmaster Tools? Paste the code you get there here."
- Paste the line into the Google Search Console field. You can paste the whole tag or just the code; the builder only keeps the code.
- Click Save and push it live with Publish changes. Only then is the tag really on your homepage.
- In Search Console, click Verify.
Looking for the field under Settings > Integrations? There you will find the line Google Search Console and Bing with the note "You confirm ownership under SEO". One click takes you to the right place.
Leave the code in place afterwards. Google checks from time to time whether it is still there. If you remove it, your verification lapses.
Why it sometimes fails
- Not published: you pasted the code and saved, but didn't click Publish changes. Google then sees the old homepage.
- Wrong address as property: you chose
https://www.example.com/, but your site redirects tohttps://example.com/. Choose the address you end up on. - Site still on the free address: only verify once your site is on your own domain.
- Clicked too soon: after a DNS change or right after publishing, it can take a while. Try again after a few minutes, or otherwise after a few hours.
Route 2: a TXT record in the DNS
If you choose a domain property, Google gives you a text starting with google-site-verification=. You add it as a TXT record in your domain's DNS, with @ as the name (the bare domain name). If your DNS is with WebOké, you do this under your domain's DNS records in your account or in DirectAdmin under DNS management. If your DNS is elsewhere, do it with that provider.
A TXT record changes nothing about your site or your email; you can have several. Do note: put the Google code in a separate TXT record, not in your SPF record. Then click Verify in Search Console. If you get an error, wait: a new record can take some time before Google sees it.
The advantage of this route: you confirm the whole domain in one go, and the verification doesn't depend on what is on your homepage. How to create a TXT record exactly is explained in the knowledge base and in the DNS course (Further reading).
Submitting your sitemap
Once your site is verified, go to Sitemaps in Search Console and enter the address of your sitemap: https://example.com/sitemap.xml. The builder creates this sitemap itself and updates it every time you publish (lesson 6.1). Google also reads it via your robots.txt, but by submitting it you can see in Search Console whether Google could read it and how many pages it contains.
After that, it's a matter of patience. It can take a few days before data appears in Search Console, and longer before all your pages are in Google. In the course Getting found online you learn to read the reports.
Bing Webmaster Tools
Bing has a similar service: Bing Webmaster Tools. Bing's search results are also used by other search engines, so it pays to register your site there too. You can import your site from Search Console, or verify it with its own code. That code starts with msvalidate.01; you paste it in the builder under SEO > Whole site > Google and Bing verification, in the Bing Webmaster Tools field. Save, publish, verify: just like with Google.
Something the builder already does for you: after every publication it reports the changed pages to search engines that support IndexNow, such as Bing. That way they know sooner that something is new. Google doesn't take part in IndexNow and reads your sitemap instead. This only happens for a site on your own domain that is allowed to be found, not on the free address.
An example
After the move, the painter adds example.com to Search Console as the URL prefix https://example.com/. He pastes the HTML tag into the builder, saves, publishes and clicks Verify: success. He submits https://example.com/sitemap.xml. A week later he sees the first searches: "painter exampletown" and "window frame painting price". That second one gets him thinking: perhaps the Exterior painting page should say more about prices.
Summary
- Search Console shows how Google sees your site; you don't need it to be found, but you do need it to know what is happening.
- Only for a site on your own domain: the free address has a noindex.
- Verifying with the HTML tag: paste it under SEO > Whole site > Google and Bing verification, Save, Publish changes, then Verify.
- Or with a TXT record
google-site-verification=in the DNS, for a domain property. - Submit
https://example.com/sitemap.xml, and register your site with Bing Webmaster Tools too.
Quiz
Exercise
Exercise A6.2: Search Console verification. Verify your site in Google Search Console, with the HTML tag or with a TXT record. Then enter the web address of your AI Builder site on your own domain. The program checks whether one of these two is present:
- a line
<meta name="google-site-verification" content="...">in the code of your homepage; - a TXT record starting with
google-site-verification=in your domain's DNS.
Green means: the verification is on your site or in your DNS. The program cannot see whether Google has already approved the verification; you can see that in Search Console itself. Red on the free address makes sense: this exercise is pointless there.
Further reading
- Free course Getting found online 2.1: Google Search Console: adding and verifying your site
- Verifying Google Search Console with a TXT record: how to avoid mistakes
- Free DNS course 4.2: TXT records and domain verification
- Free course Getting found online 2.5: Bing Webmaster Tools and IndexNow
- Verify your site ownership (Google's Search Console Help): https://support.google.com/webmasters/answer/9008080