
Module 4 · 4.3
English
Forms, buttons and widgets
Module 4: Pages, look and features · Reading time: 8 minutes
Learning objective: After this lesson you can set up the contact form (recipient, confirmation, thank-you page, spam check, newsletter and sending method), add floating buttons for WhatsApp and contact, embed a widget from another service, and you know when Custom code and Custom HTML are the right choice.
Key concepts: contact form, recipient, confirmation email, thank-you page, captcha, double opt-in, sending method, floating button, widget, embed code, consent, Custom code, Custom HTML
The contact form: two places
A form on your site has two parts. The form itself, with the fields a visitor fills in, sits on a page. You add it with the Contact section (via Blocks or Add section) or through the chat. What happens when someone clicks send is set up in Settings > Forms. You always set up that panel yourself; the chat does not do it for you.
The form always has the fields name, email and message. Through the chat you can add extra fields, up to eight: a text field, a drop-down list (for example "Indoors or outdoors?"), email, phone, a long text field, a date or a number. There is no field for sending a file or photo. If Schildersbedrijf Example wants to receive photos of the job, the thank-you text says: "Feel free to send photos to our email address."
Important: on the free site without a plan, the form is visible but greyed out, and it does not send any email. Forms only really send once your site is on an AI Builder plan. You can already prepare the settings below; they will then be used straight away.
Settings > Forms
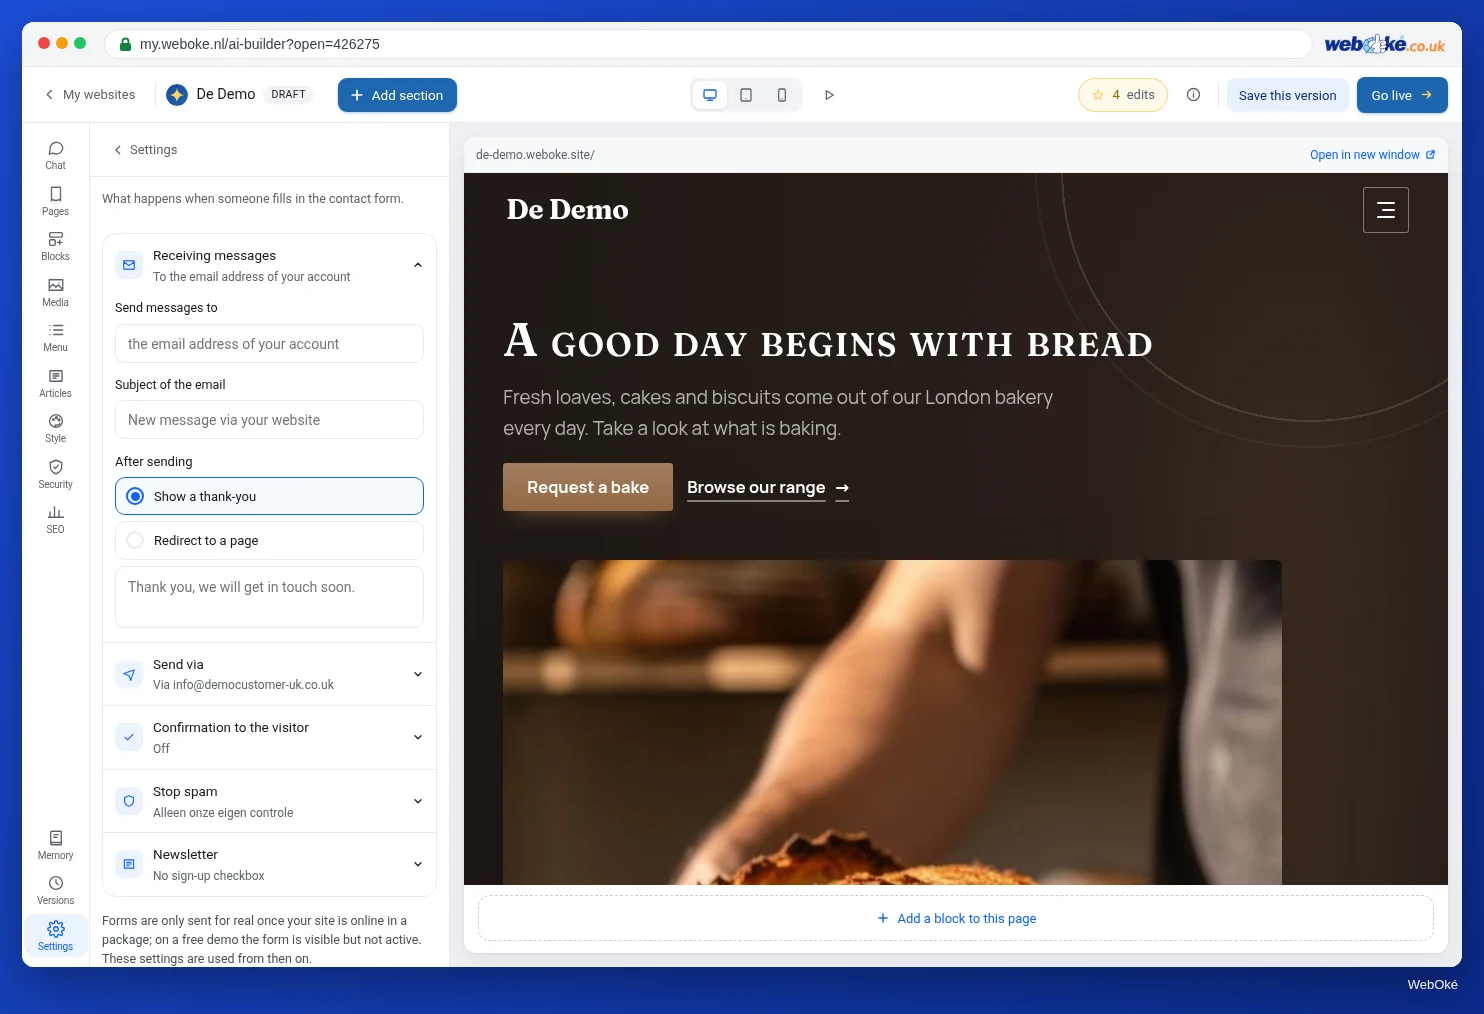
The panel has five blocks.
Receiving messages. In Send messages to you enter the email address where completed forms should go. If you leave it empty, they go to the email address of your WebOké account. Fill it in deliberately. In Subject of the email you choose the subject (empty: "New message via your website"). Under After sending you choose Show a thank-you with your own text, or Redirect to a page: a thank-you page that you create yourself and leave out of the menu (lesson 4.1). That lets you measure later how often the form is sent.
Send via. How the email is sent. WebOké server works straight away, with noreply@weboke.site as the sender. Your own email address (SMTP) is recommended: the email then comes from your own domain and is less likely to end up in spam. With Set it up for me the builder creates that address on your domain. Under your own email address you can also choose an email service, such as Postmark, Brevo, Mailgun or SendGrid. You can read why the sender matters so much in lesson 5.3.
Confirmation to the visitor. Turn on Send the visitor a copy and the visitor receives a confirmation email. That is often the first message someone gets from you. You choose the subject, Your text (with {naam} for the visitor's name), the Signature and whether the submitted message is included. The builder puts your text in the layout of your site, with your logo. Let AI write this text gives you a suggestion.
Stopping spam. Every form always has an invisible check: a hidden field and a time lock. It stops most spam without visitors noticing anything. Still getting a lot of spam? Then choose an extra check, a captcha: Cloudflare Turnstile or hCaptcha. For this you create a free account with that service and enter the Site key and Secret key. Only turn on a captcha when you need it: every extra step costs you visitors.
Newsletter. You can add a tick box to the form that lets visitors sign up with Mailchimp, Laposta, Brevo or MailerLite. Only people who tick the box themselves are added. Always with double opt-in: the visitor first confirms via an email. With Laposta and MailerLite you turn this on yourself in that service; the builder tells you where. Without double opt-in, anyone can put other people's addresses on your list.
Also: a visitor can send at most 5 messages per hour. If you have a privacy statement, a link to it appears below the form. A form collects personal data; what you need to arrange for that is covered in lesson 7.1.
Pitfall: test the form yourself after every change, from a different address than the receiving address. Check your spam folder too, and make sure the confirmation reaches the "visitor".
Floating buttons
In Settings > Buttons you add buttons that stay at the bottom of the screen on every page, on the right or the left (Corner: Bottom right or Bottom left).
- WhatsApp number: in international format, with +31 for a Dutch number and without the leading 0. If you leave it empty, there is no WhatsApp button. A Pre-filled message is optional, for example "I would like a quote for painting work." The button opens a chat with your number.
- Floating contact button: opens your contact form in a window. The message arrives at the same address as your form. You choose the Button text.
In the preview the buttons sit a little higher than on your real site, so they are not hidden behind the builder's help button.
Note: a WhatsApp button promises a quick reply. If you only read WhatsApp in the evening, the contact button is the better choice.
Widgets from other services
A widget is a piece of another service on your page: a YouTube video, a Google Maps map, a Calendly appointment planner, your Instagram, a Spotify playlist. For many services the link is enough; the builder creates the player or form itself. Examples: YouTube, Vimeo, Spotify, Calendly, Google Maps (the address is enough), Google Calendar, Instagram and TikTok (your @name is enough) and Google Forms. For other services, such as Salonized, Trustpilot or Bandcamp, you paste the embed code: the piece of code that service gives you to put on a website.
Here is how: say it in the chat with the link included ("put our route map under the contact block, address Dorpsstraat 1"), paste the code into the chat, or choose the Widget section in Blocks. The builder recognises the service, suggests a height and heading and warns you if something will not work. If you let the AI place it, that is an instruction and it costs edits; you see how many beforehand. You adjust a placed widget with Edit code on the block in the preview.
Three things to know:
- A widget only loads after consent. Other companies' services often set cookies or track visitors. With the cookie banner turned on, a widget only loads once the visitor consents to that type of cookie. The service automatically appears in your cookie banner under "What runs on your site now". Then check your privacy statement as well (lessons 7.1 and 7.2).
- Google Calendar must be public. Nobody else can see a private calendar. In Google Calendar, only make a separate calendar public with what visitors are allowed to see, never your personal calendar.
- Unsafe code is not added. The AI will not put code on your site that can pass on visitor data, hides what it does or loads something from an unknown website. It explains why.
Custom code and Custom HTML, in outline
For advanced users there are two places.
Custom code is at the bottom of Settings > Integrations: code that has to be on every page, In the head of every page or At the bottom of every page. For example the loading script of a chat service or a review widget. The builder does not check this code ("We do not check this code"). The cookie banner blocks well-known services until there is consent. Only tick This code is necessary for code that does not track visitors, because it then loads immediately. Custom code does not run in the preview in the builder, but it does on your real site. Custom code does not work on the free site. For a measurement ID such as Google Analytics, do not use Custom code but the dedicated field in Integrations (lesson 7.2).
Custom HTML is a section in Blocks. You paste your own HTML and optionally CSS, and adjust it later with Edit HTML. Colours and fonts follow your house style. Scripts, iframes and forms do not work here; use a widget for those.
Only use either of them when there is no other way: someone else's code is a risk to speed, security and privacy.
In the builder: how to do it
- Put the Contact section with a form on your contact page.
- Open Settings > Forms. Fill in Send messages to.
- Under Send via choose your own email address, or leave it on the WebOké server until your domain is ready (lesson 5.3).
- Turn on Send the visitor a copy and write your own text.
- Under After sending choose a thank-you message or a thank-you page.
- If needed, add a WhatsApp or contact button in Settings > Buttons.
- Put your site online and send a test message.
Summary
- The form sits on a page; what happens to it is set up in Settings > Forms.
- Fill in Send messages to deliberately; preferably choose your own email address as the sender.
- On the free site the form sends no email; attaching a file is never possible.
- Floating buttons for WhatsApp and contact are in Settings > Buttons.
- Widgets only load after consent; Custom code and Custom HTML are for advanced users.
Quiz
Exercise
Exercise D4.3: Your contact form and a widget. Set up your form completely and add one widget that genuinely adds something.
Checklist:
- [ ] Contact section with a form on your contact page;
- [ ] Send messages to filled in with an address you read every day;
- [ ] sending method chosen, and you understand why;
- [ ] confirmation to the visitor with your own text;
- [ ] thank-you message or thank-you page set up;
- [ ] one widget added (for example a map or an appointment planner) and checked that it appears in the cookie banner;
- [ ] site online and a test message sent (only with a plan; on the free site you check the settings).
Questions:
- At which address do your form messages arrive, and through which sending method?
- Which widget did you choose, what does it add for your visitor and what does a visitor who does not give consent see?
- Did your test message arrive, and did the confirmation reach the "visitor", or did it land in spam?
After "done" you will see a sample answer: Schildersbedrijf Example sends messages to info@example.com via its own email address on the domain; the widget is a Google Maps map with the address, which only loads after consent and otherwise shows a panel with a button to give consent; the test message arrived, and so did the confirmation, not in spam.
Exercise D4.3: Your contact form and a widget
You do this exercise yourself; no one checks it. Tick off what you've done and mark the exercise as done.
Schildersbedrijf Example sends messages to info@example.com through its own email address on the domain. The widget is a Google Maps map with the address; without consent, a visitor sees a panel with a button to give consent. The test message and the confirmation arrived, not in spam.
Your ticks and notes only stay in this browser; we don't send them anywhere. If you're signed in, we only save in My courses that you've done the exercise.
Further reading
- A contact form on your website: emailing the fields and preventing spam
- Free course Email in order: setting up and making sure it arrives properly 7.3: Mail from your website and forms
- Free course Email in order: setting up and making sure it arrives properly 7.2: Consent, unsubscribing and a clean list
- Using click to chat (WhatsApp Help Center): https://faq.whatsapp.com/5913398998672934
- Create & manage a public Google calendar (Google Calendar Help): https://support.google.com/calendar/answer/37083