


For migrating your files and photos from Dropbox to your Nextcloud server at WebOké, we have created a convenient tool that can handle this automatically.
In this article we explain the necessary steps step-by-step.
Step 1 - Go to https://www.dropbox.com/login and log in to your Dropbox account.
Step 2 - Log in to your Nextcloud server and click on your profile in the top right, then click on 'Settings' in the dropdown menu

Step 3 - Click on Data migration on the left

Step 4 - Click here on Connect to Dropbox to get an access code

Step 5 - Dropbox.com will then open and you'll see this message, click Allow here

Step 6 - Copy the access code displayed in the next screen

Step 7 - Paste the access code in the Dropbox access code field
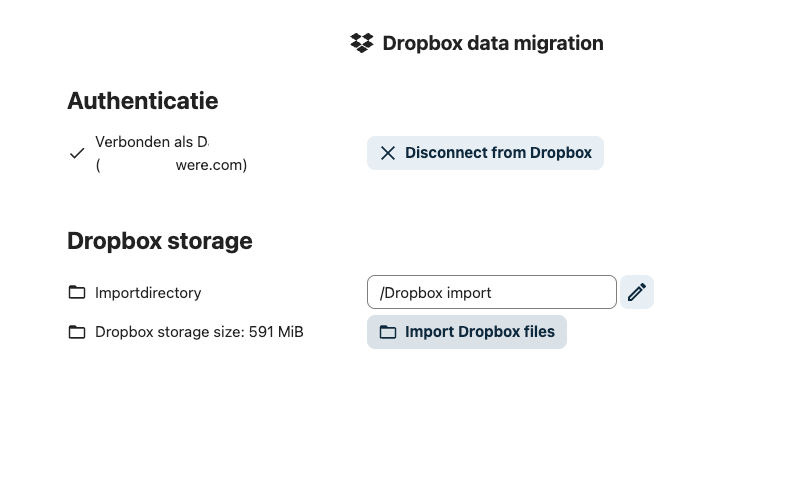
Step 8 - A connection with your Dropbox account has now been established.
In the Import directory field you can choose which folder on your Nextcloud server all data should be moved to. You can change this by clicking on the pencil icon, you can create a new folder for this or use an existing folder.
You cannot choose what will be transferred, the tool takes everything that is in Dropbox. If you have certain data that you no longer need or don't want to transfer, it's best to delete it from Dropbox first.
Click on Import Dropbox files when you're ready to start the migration.
That's all! The migration is now running.
Depending on the amount of data, this may take a while, up to several hours.
Our advice is to leave this window open and do something else, the server will continue working in the background :-).
After that, all your data is safely stored on your own Nextcloud server running on our physical servers in the NorthC data centers in Aalsmeer and Oude Meer, congratulations!