
Getting started with your VPS
Your VPS is your own virtual server in our data centre in the Netherlands. You get root access, a fixed IPv4 and IPv6 address and you choose the operating system. A VPS is unmanaged: you manage the software and security, we make sure the hardware, network and backups keep running.
1. Choose an operating system
After ordering you receive an e-mail with a button to your VPS. You can also find it under My Products. Choose:
- Operating system: Ubuntu 24.04 or 26.04 LTS, Debian 12 or 13, AlmaLinux 9 or 10, or Rocky Linux 9 or 10. Not sure? Pick Ubuntu 24.04 LTS: most guides on the internet assume it.
- Root password: at least 12 characters with a lowercase letter, an uppercase letter and a digit. We do not store it.
- SSH key (optional, but recommended): paste your public key to log in without a password. See Logging in to your VPS with SSH.
After about two minutes your VPS is running and you receive an e-mail with your IP address.
2. Log in
Open a terminal (on Windows: PowerShell) and type ssh root@your-ip-address. The first time, your computer asks whether you trust the server; type yes.
3. Update first
- Ubuntu and Debian:
apt update && apt upgrade -y - AlmaLinux and Rocky Linux:
dnf upgrade -y
Then read Securing your VPS: five minutes of work that prevent a lot of trouble.
What can you do in the VPS screen?
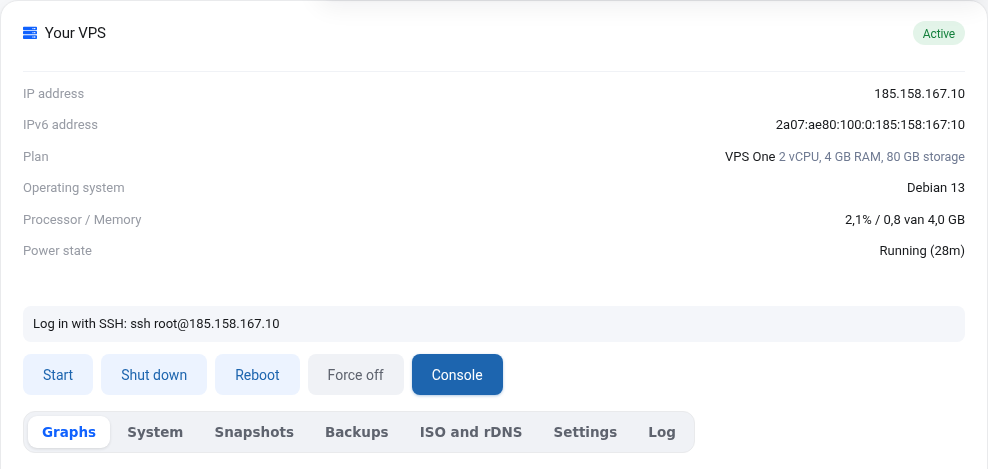
- Power on, off and restart. "Force off" pulls the plug; prefer Shut down.
- Console: your VPS screen in your browser, even when SSH or the network is down.
- Graphs of processor, memory, network and disk, per hour up to per year.
- System: operating system, disk usage and IP addresses from the inside.
- Snapshots and backups, attach ISO, reverse DNS, new root password and reinstall.
Was this article helpful?
